A couple years ago I used p5.js to create some proof-of-concept animations for a work project. One of those animations was wavy horizontal lines that slowly undulated and flowed. Since then I've wanted to create a static version of that concept to use as the background of a hero element or headline. My goal was to give each page on this site its own random but unique hero image.
p5.js has all the features I'd need to do this, but it's around 1mb minified. It's also more meant for sketches and experiments, and not really designed for use on production websites. As it turns out, I only need a small subset of p5.js's features to do what I want, and it's possible to assemble those features with a much smaller overhead. The key features I need are as follows:
- A 2d Perlin noise function to replace p5's noise. This will help create a grid of smoothed-out random values.
- Some way to seed the random noise function to replace p5's noiseSeed). This will make the noise field for each page unique but consistent.
- A way to compute and draw Catmull-Rom splines to replace p5's curveVertex. This will draw the curvy lines based on grid of coordinates, incluenced by the noise fields.
As someone who has never taken a math class past high school, I have to rely on smarter people to supply these functions. My job is to tie it all together and make it look nice.
Initial setup
The first step is to create a grid of points on a canvas element. There are countless ways to do this, so I won't really dig into it here. I'll draw little circles on the points so you can see them. So far it's not very exciting.
Move the points around a little bit
To give the grid some personality, each point's x and y position is randomly nudged a little bit. Using Math.random() for the adjustments makes things look very messy. It's also not consistent, since Math.random() is different every time.
Cleaning up the mess with noise
Using a noise function instead of Math.random() will turn this nonsense into something appoaching order. A Perlin noise algorithm can generate a sequence of random numbers whose values are smoothed out instead of totally random. Noise can be one dimensional (a line), two dimensional (a grid), or three dimensional (a cube). Can noise go higher than three dimensions? I have no idea. Probably. Ask someone that knows math.
To replace p5.js's noise function, I found a simple noise module on npm called noisejs. It was last updated ten (10!) years ago, originally forked from another codebase and modified to work with import. As an aside, noisejs doesn't really support one-dimensional noise, but it's easy to can fake it for demonstration purposes.
If you use a one-dimensional noise function for each line, it makes things nice and smooth, but you'll notice each line is independent from the lines around it. There's a nice flow horizontally, but not vertically.
If you use two-dimensional noise, you can smooth out the grid both horizontally and vertically.
Seeding a random number generator
Things look pretty good now, but the lines are different every time the page loads. Try refreshing and you'll see the above image change. This happens because the noise function is initialized with Math.random(). If we initialize it with a static value every time, the lines will be the same every time. But that's not quite the goal either. We need a number to initialize the noise function that's unique for every page, but consistent across page loads.
In p5.js, you can use noiseSeed to seed a random number generator. To replace this, there's a package called seedrandom. You can pass in a string to seed a random number generator, then call it as many times as you like. A given seed will always produce the same sequence of random numbers.
Since each page has a unique permalink, using window.location.pathname as the seed value will give each page it's own unique number to initialize the two-dimensional noise function, which will yield noise values unique to each individual page.
I think it's kind of interesting to see where each point falls compared to its original position.
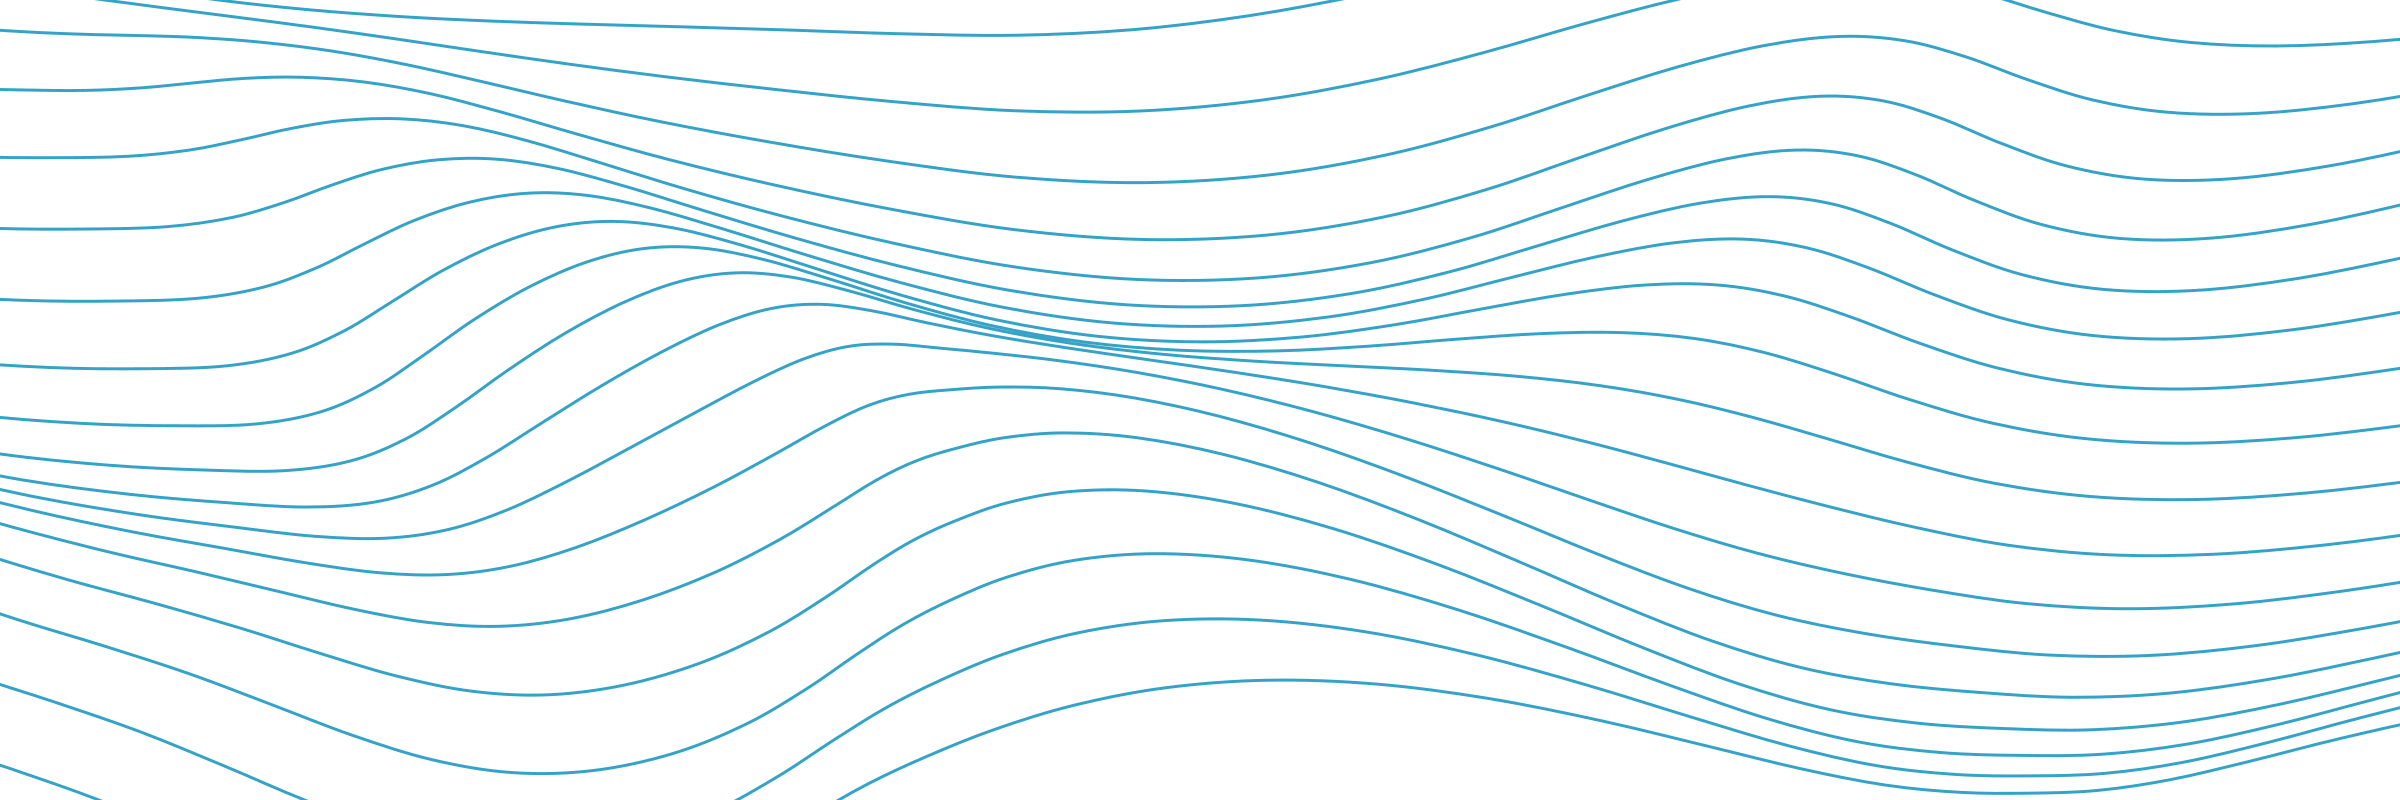
Make the lines wavy
The image is just about done, but the points are connected by a straight lines. It's difficult to tell in these examples because the noise function outputs smooth values anyway, plus the points are pretty close together. But if you look closely you can see some sharp angles in a few spots, so it's worth fixing. It's a little easier to see the sharp angles if the little circles are removed.
A quick search led me to a Codepen by osublake that implements Catmull-Rom Splines in an SVG using bezier curves. The parameters for drawing a bezier curve in SVG are the same as drawing one on a canvas, so the code can be easily adapted. As a nice bonus, the the function to compute the curves is way smaller than I thought it would be.
The image is pretty much done!
Magic numbers
This code uses a few magic numbers. Tweaking these numbers can create wildly different results. I arrived at a lot of these by trial and error.
Spline tension
Since the points are so close together horizontally, adjusting the spline tension is difficult to demonstrate. As the value gets lower, the lines lose their curves. As the value gets higher, the curves start to loop around on themselves.
Spline tension reduced by a factor of 10.
Spline tension increased by a factor of 10.
Movement intensity
The second magic number is the intensity of the movement applied by the noise field. Too low and the curves are kind of boring. Too high and the curves start to overlap.
Intensity halved.
Intensity doubled.
Noise resolution
The last magic number is the resolution of the noise field. If you zoom in too much, there's not enough variance across the image. If you zoom out too much, there's too much variance and you lose any sense of order.
Noise resolution halved.
Noise resolution doubled.
Using the image in the layout
Now that I have the image looking good, it's time to add it to the site. I've found that browsers can treat images a little differently than canvas elements when it comes to scaling and rendering. To make life easier, I set the src of an empty img to the contents of the canvas using the todataUrl() method. This makes the image a png. This is a pretty expensive operation, but the results look much better in my opinion. To keep performance under control when there are a lot of these components on a page, this step can be skipped and the canvas will be displayed instead of the image.
Using some absolute positioning, padding, and flexbox, the image is placed behind the page title and the title is vertically centered. This looks pretty nice, but the text might be a little be hard to read against the lines.
An example
To make the text more readable, a gradient is placed behind the title that transitions from transparent to the solid background color of the site. If the site didn't have a solid background color, there's probably some way to use a mask image to accomplish the same thing.
An example
Here's the same gradient in a more visible color, so you can see exactly where it lies.
An example
The size of the gradient is based on height of the title, not the height of the image. This ensures the text remains readable even as the screen changes sizes or the title wraps to multiple lines.
An example that has a very long title that probably wraps around a few times to demonstrate where the gradient is drawn.
Again, here's the same example, but with a visible gradient.
An example that has a very long title that probably wraps around a few times to demonstrate where the gradient is drawn.
Conclusion
There's so much customization and variation that could go into this concept, it was difficult to know where to stop. Feel free to take the code and run with it. Let me know if you make something cool.
Update
After this article was written, the code was adapted to render the image at build time rather than on the client. For more information, see the follow-up article.